Solvemix

Suche Spickipedia

  • Home
  • Android Smartphones
  • iOS Smartphones
  • Blackberry Smartphones

Samsung Galaxy Note 9 Change Sim Card Pin - Solved!

Details
Manuel
Android Smartphones
Year 2019

If you received the Samsung Galaxy Note 9 new and with a Sim card, you will often find a new Sim card pin on it.

If you do not want to remember this new pin, but want to use a code you already know, please proceed as follows:

Change Sim Cards Pin - Instructions
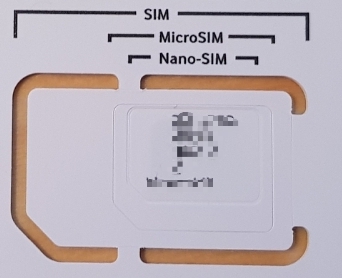
How to change sim pin

1. Open the Android System Preferences and then "Device Security

2. From here please select "Other security settings".

3. Under the menu item "Sim lock setup" you now find the option "Change pin of the Sim card" - select the entry

4. You must now enter the old Sim card pin and then set your desired pin. (your old pin)

Now you have successfully changed the Sim card pin on your Samsung Galaxy Note 9 to a desired pin.

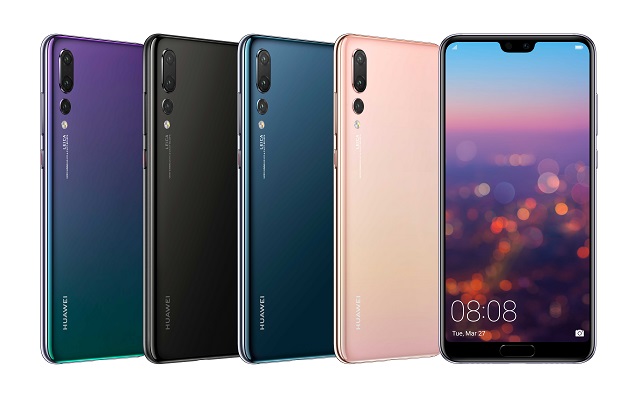
Huawei P20 Pro How to change Sim Pin - Solved

Details
Manuel
Android Smartphones
Year 2019

If you have received the Huawei P20 Pro new and with a Sim card, then there is often also a new Sim card pin on this.

If you do not want to remember this new pin, but want to use a code you already know, please proceed as follows:

Change Sim Cards Pin - Instructions

Huawei P20 Pro

1. Open the Android settings

2. Navigate to "security and privacy" and then to "more

3. Select "Set Sim 1 lock".

4. Type out "Change Pin1 of the Sim Card".

5. Then enter your old Sim Pin and then the new desired pin.

Now you have successfully changed the Sim card pin on your Huawei P20 Pro to a desired pin.

Google Pixel 3 Enable percent display for battery - Solved

Details
Manuel
Android Smartphones
Year 2019

Usually it's handy to activate the battery indicator in percent in the status bar of Google Pixel 3. This allows you to see very quickly how much battery charge is still available and when the device is about to be charged.

If the percentage display on your Google Pixel 3 is not visible, please proceed as follows:

Activating or deactivating the battery indicator in percent

First, navigate to the "Settings" menu of your Google Pixel 3 by dragging down the notification screen and tapping the gear icon.

Search and select "Battery". The option should be at the bottom of the settings list.

Now activate the option "Battery display in percent" - Done!

Now you can always see directly in the status bar how much battery is left in percent. This is useful but has the disadvantage that it takes up more space.

Philips Hue App Create Shortcuts - Tip for iPhone

Details
Manuel
Android Smartphones
Year 2019

For the Philips Hue Smart Home lamps one can now create so-called shortcuts by means of an app on the smartphone. This allows you to control special functions directly with the language assistant "Siri".

First you need the "Apple App Shortcuts", which can be downloaded free of charge from Apple's iTunes Store.

  • Download "Shortcuts" App

Then you will need the latest version of the Philips Hue app and possibly the latest firmware version on your Philips Hue Smart Home lamps.

  • Download Philips Hue App

If this is installed on your iPhone, then open the Philips Hue App. You can now select a suitable scene from different scenes, for example:

  • Sunset
  • Relax
  • light
  • Dimmed
  • northern lights
  • and many more

For example, you can also create your own scenes. Once you've selected a scene, touch it. A pencil appears in the upper right corner. Pick this one.

A small pop-up menu appears in which the following menu item must now be selected:

  • Add to Siri

Then you must enter the voice command to be used via the record button. For example, "Let there be light."

From now on, this shortcut will call up the scene previously selected in the Philips Hue app and control your lamps accordingly.

Samsung Galaxy Note 9 Notification LED does not flash on new notification

Details
Manuel
Android Smartphones
Year 2019

The Samsung Galaxy Note 9 has a practical notification LED on the front, which informs you about new messages, missed calls or other notifications.

However, if this LED does not show you when a new notification is present, for example because it is not flashing, please check the following settings and tips to fix the problem:

LED Notification activated in Android settings?

First open the app menu on your smartphone and then the settings. Go to the "Display" menu item. In the next submenu you can already see the option:

  • LED display

Here the controller must be set to "on". If that's the case, then it's not because of this attitude.

Disable Ultra power save mode

If your Samsung Galaxy Note 9 is set to MAX, the LED may stop blinking or glowing when new messages, calls or notifications arrive.

To remedy this, set the power save mode to "Medium" or "Off".

Perform a restart

If the LED didn't light up either, we recommend you to restart your smartphone.

Wipe Cache partition

With this method no data will be deleted from you! Only old temporary system files are emptied from the cache. However, they are often responsible for a software error in Android, for example the LED does not work properly anymore.

How to perform such a Wipe Cache partition is explained in detail in the following article:

  • Wipe Cache Partition - Samsung Galaxy Note 9

We hope that this has also helped your Samsung Galaxy Note 9 to light up the LED again when a new notification is received.

Samsung Galaxy S9 does no longer vibrate - Solution

Details
Manuel
Android Smartphones
Year 2019

The Samsung Galaxy S9 will alert you by vibrating a call or incoming notification. The vibration also gives you haptic feedback when entering data via the keyboard or soft key buttons.

Now it is possible that the vibration of your Samsung Galaxy S9 no longer works or the smartphone no longer vibrates.

The reason for this is mostly to be found in the settings of Android. We therefore recommend that you check the following options here:

Check vibration settings on the Samsung Galaxy S9

To do this, please open the settings and then "Sounds and Vibration". From here you can make the following settings:

Vibration intensity

 First open the field "Vibration intensity" - Make sure that all controllers are set to "active", preferably to 100%. So you have the full vibration strength.

Switch on vibration feedback

In the Sounds & Vibration menu, scroll down to Vibrate Feedback - Enable this option to have the Samsung Galaxy S9 vibrate when you use buttons on your phone.

Switch on keyboard vibration

Finally scroll down to "Keyboard vibration" - Enable this option to have the Samsung Galaxy S9 vibrate when typing on the Samsung keyboard.

If you have checked and activated these options, your Samsung Galaxy S8 should vibrate again as usual for calls and messages and you should also feel a feedback via vibration when navigating in the menu.

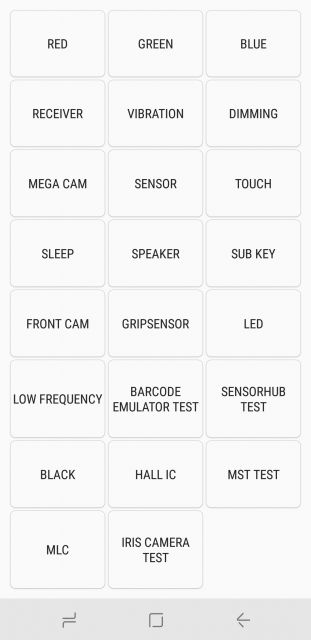
Open test menu - Check vibration motor

Samsung Service MEnu

If this did not help, there may be a defect with the vibration motor. Therefore, check via the service menu whether the vibration motor of your Samsung Galaxy S9 is working.

The Test menu can be opened as follows:

  • Open service menu on Samsung Galaxy S9

We hope that now the vibration on your Samsung Galaxy S9 triggers as desired.

Google Pixel 3 Service menu available for sensor testing? Solved!

Details
Manuel
Android Smartphones
Year 2019

The hardware of Google Pixel 3 has a lot of technical features. Many sensors are integrated, which have different tasks. If you now want to test these sensors for function, you may be looking for a service menu for sensor tests.

Unfortunately, there is no such menu, as for example with Samsung smartphones, and therefore you have to resort to the following trick:

Read sensor data on Google Pixel 3

On Google Pixel 3 you need to install the following free app from the Google Play Store:

  • Download Sensors Multitool

After you have installed the app on your Google Pixel 3, you can view the data that is read out by the sensors.

The following data can be checked:

  • rechargeable battery
  • GPS
  • WIFI
  • acceleration sensor
  • magnetic sensor
  • gyroscope sensor
  • proximity sensor
  • light sensor
  • acceleration sensor
  • position sensor

You now know how to read the sensor data on Google Pixel 3.

If a sensor does not record any data here, it can very well be that it has a defect.

Google Pixel 3 Easter Egg Open - Secret

Details
Manuel
Android Smartphones
Year 2019

On Google Pixel 3 you can call various functions within the Android system which are "secret" and hidden. Beside the developer options this is also the Easter Egg.

An Easter Egg is a small gimmick on the part of the programmers. Often the Easter Egg consists of an animation, or a small game. The Easter Egg has a long tradition in Android and is available in every version since then. The Pixel 3 mobile phones with the new Android have a "sketchpad" as Easter Egg.

Below we describe you step by step how the Easter Egg can be displayed on Google Pixel 3:

Show Easter Egg - Google Pixel 3

On Google Pixel 3, open the App menu and then the Preferences. Scroll down to "Device Information" and then touch the entry.

Alternatively, select "Software Info". Then you will see an entry with "Android Version". Tap this entry several times in quick succession until the menu disappears and a large P appears on the display instead.

In the Android P spiral animation, you can now open the Sketch Block app by tapping and pressing the P in this screen.

With the Easter Egg you can sketch like with any other sketch app.

You can use different colors, change the size of the drawing tip, and even change its orientation for larger sketches.

Unfortunately it is not possible to delete individual lines or strokes here. The cross key deletes the entire drawing.

Tip: A sketch can be saved using the Screenshot function.

You now know how to open the hidden and no longer so secret Easter Egg on a Google Pixel 3. Please keep in mind that the Easter Egg changes with every version of Android.

Huawei Calibrating the Compass - Instructions for the Magnetic Sensor

Details
Manuel
Android Smartphones
Year 2019

A Huawei smartphone has various sensors integrated, including a magnetic sensor, which is used for the compass function. If you notice now that the magnetic sensor or compass of the Huawei smartphone does not correctly indicate the points of the compass, you should definitely perform a calibration.

Below we describe step by step how the compass or magnetic sensor of the Huawei smartphone can be calibrated.

Hint:

Not all Huawei devices have an integrated magnetic sensor! Check this first by reviewing the technical specifications of your smartphone.

Calibration compass on a Huawei smartphone

Compass Calibration

1. Open the app Google "Maps" on your Huawei smartphone

2. Activate the location information on your smartphone (via the status bar), so that you yourself are displayed as a blue dot on the map

3. Now tap yourself (blue dot) on the map

4. You will see "Calibrate Compass" below, click on it.

5. You will see a pop-up window showing the accuracy of the compass.

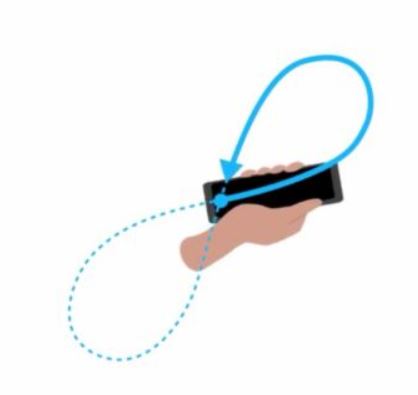
6. If it says "LOW" in red, swing the Huawei smartphone in the shape of an eight.

7. Repeat the procedure until the status changes to "HIGH

You now know how to calibrate the compass of your Huawei smartphone when it shows the wrong direction.

The compass loses accuracy from time to time due to environmental influences, such as electric fields, magnets, etc. The compass is not as accurate as it should be.

Google Pixel Compass Sensor Calibration - Instructions

Details
Manuel
Android Smartphones
Year 2019

The Google Pixel has various sensors integrated, including a magnetic sensor, which is used for the compass function. If you notice now that the magnetic sensor or the compass of the Google Pixel does not display the cardinal points correctly, then you should absolutely carry out a calibration.

Below we describe step by step how the compass or magnetic sensor of the Google Pixel can be calibrated. Proceed as follows:

Calibration of the Compass

Compass Calibration

1. Open the app "Maps" on the Google Pixel

2. Activate the location information so that you are displayed as a blue dot on the map yourself

3. Now tap yourself (blue dot) on the map

4. You can see "Calibrate compass" below, select the entry

5. Then you will see a pop-up window showing you the compass accuracy.

Perform Compass Calibration

6. If there is "LOW" in red, then your Google pixel will swing in front of you in the form of an eight.

7. Repeats the process until the status changes to "High

You now know how to calibrate the Google Pixel compass if it shows you the wrong direction.

The compass loses accuracy from time to time due to environmental influences, such as electric fields, magnets, etc. The compass is not as accurate as it should be.

More Articles ...

  1. Google Pixel 3 Disable Automatic App Updates - Solution
  2. Huawei P20 Pro 4K Video Format Setting - Increase Efficiency with H.265
  3. Huawei Smartphone - Meaning of the moon symbol in the status bar
  4. Huawei P20 Pro What does the moon symbol mean? Solved!
  5. Youtube App Darkmode is now available - Android
  6. Google Pixel 3 and 3XL Can the memory be expanded - Solved
  7. Google Pixel 3 and 3XL Is a notification LED is available? - Solved
  8. Google Pixel 3 How to add Widget - Home screen
  9. Huawei P20 Pro SMS Show messages on Sim card - Tip
  10. Google Pixel 3 XL How do I hide the notch? Solved!
Page 25 of 317
  • Start
  • Prev
  • 20
  • 21
  • 22
  • 23
  • 24
  • 25
  • 26
  • 27
  • 28
  • 29
  • Next
  • End


  1. You are here:  
  2. Home

Imprint

Privacy Policy

Privacy and Terms of Google

Sitemap