Solvemix

Suche Spickipedia

  • Home
  • Android Smartphones
  • iOS Smartphones
  • Blackberry Smartphones

Samsung Galaxy S5 adjust display colors

Details
Manuel
Solvemix
Android Smartphones

There is the possibility on the Samsung Galaxy S5 to adjust the colors of the display. Adapting means that the colors can be displayed strong or pale. This is especially interesting for photos, videos and movies. The display color of the Samsung Galaxy S5 can be adjusted as follows:

Open from the Home Screen the menu and then the Settings. Select here the button "display" and subsequently in the submenu that appears, select "Screen Mode". You can now select between the following settings.

    - Adapt display
    - dynamic
    - standard
    - professional photo
    - cinema

Each setting changes the color output of the display. This can be directly seen in the example image above. Now choose the best looking screen mode for you in color saturation and then tap on "Save".

If you want that your Samsung Galaxy S5 takes the color matching for you depending on the situation, then select the item "Adapt Display". Here the color adjustments are performed directly depending on the used app. You know now how to adjust the colors of the Display on the Samsung Galaxy S5.

Samsung Galaxy S5 Place calendar on the home screen - Solved

Details
Manuel
Solvemix
Android Smartphones

The Samsung Galaxy S5 has an app called S Planner, which provides a calendar function. With this calendar you can easily manage your appointments. A really handy feature is that you can place the calendar with the current month view directly on the home screen of the Samsung Galaxy S5.

We would like to explain how you can place the S-Planner calendar on the home screen of the Samsung Galaxy S5.

First, return to the home screen. Now press long on the left soft key button to enter the settings for the home screen. The individual pages of the home screen are now displayed. Below you can see a button with "widgets". Tap on it and you can select from a list of different widgets. Search here for: "S Planner".

The widget can be configured as follows:

    - Mini-Today view
    - month view

We recommend you here to select the month view of the widget, because it gives you the best overview of upcoming appointments. Also it is easier to enter a new date directly from the Home screen of the Samsung Galaxy S5. Now tap on the widget and put it on your home screen. You need almost an entire home screen page for this widget.

You know now how to put the calendar on the home screen of the on the Samsung Galaxy S5 and thus always has an overview of current events.

Samsung Galaxy Note 4 Create and edit APN access points manually

Details
Manuel
Solvemix
Android Smartphones

You can create on your Samsung Galaxy Note 4 an access point manually and edit it. An access point is needed for the mobile data connection and of course to surf the Internet. Only if an access point exists your smartphone can connect to the Internet through the wireless network of your provider. Mostly the data is automatically entered from the beginning, but it may be in some reasons, that an access point must be entered manually in the Android settings.

We show you now in this paper how to create and edit an access point on the Samsung Galaxy Note 4 for the mobile Internet:

Open from the home screen of the Samsung Galaxy Note 4 the menu and then the Android settings. Navigate to:

Section "Network connections" --> More networks --> Mobile networks --> Access Point names

In this menu you can now use the plus icon at the top of the screen to add a new APN access point to your smartphone. A window will open in which you must now put in various data to create your access point.

Have you entered all data, scroll up and then tap on the three-point symbol. In the mini pop-up menu select "Save". Your new access point with the APN settings is now available on the Samsung Galaxy Note 4 . If not already done, mark the just created access point as "active".

Finished! Your Samsung Galaxy Note 4 should now connect to the o the mobile Internet via the access point now.

Samsung Galaxy Note 4 Activate Vibration when ringing

Details
Manuel
Solvemix
Android Smartphones

You can turn on vibration for incoming calls on your Samsung Galaxy Note 4. With the vibration of the smartphone you can recognise faster that a call comes in. The "Vibrate when ringing" function, can easily be activated within the Android operating system. We want to tell you now how it works.

Open from the homescreen of the Samsung Galaxy Note 4 the menu and then the Settings. Tap here the button "Sound".

In the submenu that now opens, you will see the "Vibrate when ringing" option in the section "Ringtones and notifications". Set in the corresponding checkbox a hook to enable this function.

If you now receive a call on your Samsung Galaxy Note 4, then the phone will automatically vibrate and thus make you aware of the call.

Samsung Galaxy S5 How to remove Sim card from card slot - Solved

Details
Manuel
Solvemix
Android Smartphones

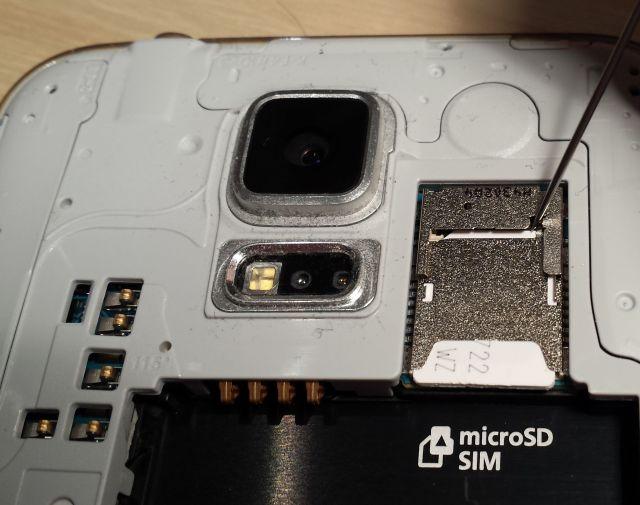
If you want to remove the sim card from your Samsung Galaxy S5, because you sell  it or you switch to another mobile telephone carrier, this can sometimes lead to problems. The Sim card is inserted into a Sim card slot, from which it is very difficult to remove. The problem is that the Sim card is very difficult to grap. The tight fit in the sim card slot of the Samsung Galaxy S5 is the reason.

That's why we want to show you a tip that makes it easier for you to remove the Sim card from the Samsung Galaxy S5. This works as follows:

- You need a sewing needle.

Now open the battery cover of your Samsung Galaxy S5 and remove the Micro SD card, if inserted. Underneath lies the SIM card.


With the needle you must now slide the Sim card as shown in the picture a little bit forward. The removal of the card from the slot is then easier, beacuse you can grab it with your fingers.

You have to be very careful with this method, so that you will not damage any components of the Samsung Galaxy S5 with the needle. Dexterity is of course needed. We hope this tip has helped you to remove the Sim card of the Samsung Galaxy S5.

Samsung Galaxy Note 4 screen remains dark after phone call

Details
Manuel
Solvemix
Android Smartphones

If you make in a phone call with your Samsung Galaxy Note 4, it can happen that the display remains dark after terminating the call. It is not possible to make any actions until you have turned off the smartphone via the power button and turned it on again. Usually this error occurs after each call.

The reason of this error is the proximity sensor of the Samsung Galaxy Note 4. The Samsung Galaxy Note 4 uses this sensor during a call to check if your face is near the phone. So the display doens´t needs to be lit continously during the whole call. When the proximity sensor is covered or blocked then it may happen that the smartphone stays at the status "calling" although you already finished the call.

So now you have to check whether the proximity sensor of your Samsung Galaxy Note 4 is covered with something. The sensor is located right next to the earpiece. You have to check:

     - Have you stuck a screen protector? If so, does it covers the sensor?
     - Is dirt or dust in front of the sensor?

If the sensor is covered, then you need to make it clear.

If you do not find anything, check the values of the sensor via the service menu of your Samsung Galaxy Note 4. This works as follows:

Navigate in the service menu of your Samsung Galaxy Note 4 by opening the phone app and then entering the code *#0*# at the keypad. In the service menu, tap at the "Sensor" field. The second entry is called "Proximity Sensor" . The value of "ADC" should be about 10-15, so that the proximity sensor of your Samsung Galaxy Note 4 works properly. A values close to 50 indicates a problem with dust.

In "proximity" the value should be "0", since this means that the sensor has not been triggered. "1" means that the sensor is triggered and activates features that are associated with it in Android.

There are two possibilities:

     1. Dust has come under the glass of the proximity sensor
     2. The proximity sensor on your Samsung Galaxy Note 4 was installed not correctly --> warranty

If your note dust under the glass, then you can still try the following trick:

It may be that dust is permeated through the earpiece to the proximity sensor and therefore triggers this. Take a straw and blow with it into the earpiece towards the proximity sensor. As a result, the dust may moves away from the sensor and with a little luck the proximity sensor works properly again.

Google Maps View saved offline maps - Tip

Details
Manuel
Solvemix
Android Smartphones

You can save Google Maps offline maps so that they can be used without an Internet connection. Saving an offline maps is very simple as we described in this article: Instructions to save offline maps in Google Maps app


If you now want to view a map stored in Google Maps, we want to show you here where to find it:


Open on your Android smartphone as First the Google Maps app. Tap now the top left icon with the three horizontal bars to open the menu. Then navigate to "Your  Places". If you now scroll a little way down, then you see the section "Offline maps" In this section is the button "View all and manage".

Tap on it and you now see all offline maps that you have downloaded within your Google Maps app. You will receive a additional informations for example when this card expires and how much space it needs on your smartphone.

You now know where you can view the stored maps in Google Maps on an Android smartphone.

Google Maps How to delete offline maps - Solved

Details
Manuel
Solvemix
Android Smartphones

If you have maps stored offline within the Google Maps app on your Android phone then it may be that you want to delete them, because they are no longer needed or simply to free storage space. In this guide, we want to show you how to delete stored offline maps in Google Maps.

For this purpose, please complete the following steps:


1. Open the Google Maps app on your Android smartphone
2. Tap the top left icon with the three bars to open the menu. Then select "Your places"
3. Scroll all the way down to the section "Offline Maps" and then tap on the button "View all and manage all"
4. Tap next to a stored map on the three-point icon, a menu will pop up now
5. Choose "Delete".
6. Confirms the Delete-Warning and the offline map will be removed from your Android smartphone

You now know how to quickly and easily delete stored offline maps in Google Maps.

Samsung Galaxy Note Edge Which Sim card is required - Tip

Details
Manuel
Solvemix
Android Smartphones

If you want to buy the Samsung Galaxy Note Edge, then you may ask the following question:

"Which Sim Card size do I need for the Samsung Galaxy Note Edge? Can I use my old sim card?"

Since there are currently three different Sim card sizes and formats on the market, it is very important to ask this question. Otherwise it may happen that after receipt of the smartphone you can not make calls caused by the wrong sim card. That would be a pity. That's why we want you to answer this question here in this post. First of all:

The Samsung Galaxy Note Edge requires a so-called Micro Sim Card.

The Micro Sim card belongs to the currently most used Sim card format , but is slowly being replaced by the Nano-SIM card. Verifie in any case, whether you currently use a Micro Sim card.

If so you can use the Samsung Galaxy Note Edge without problems

If not, then you have to get a Micro Sim Card. The easiest way is to request such a sim card from your mobile phone carrier. This is usually free or available for little money.

You know now which Sim Card is needed by the Samsung Galaxy Note Edge in order to make phone calls, send text messages and to use the mobile Internet.

Samsung Galaxy Note Edge Create Screenshot - Instructions

Details
Manuel
Solvemix
Android Smartphones

The Samsung Galaxy Note Edge is an exciting smartphone, which has a display that wraps around the edge. This creates a unique design of the Samsung Galaxy Note Edge. Of course, this Samsung smartphone is also equipped with the Android operating system. This makes it very easy to create screenshots. A screenshot   stores the content currently shown at the display in an image file. The screenshot process is therefore sometimes called screen printing or hard copy.

In this guide we want to tell you three ways how you can create a screenshot with the Samsung Galaxy Note Edge:

1. Create a Screenshot with key combination on the Samsung Galaxy Note Edge

Display at your smartphone what you would like to save with the screenshot. Then press the following two buttons simultaneously:

     - Power On / Off Button
     - Home button

This key combination must now be pressed and kept at the same time for about 2 seconds. Subsequently, the screenshot will be triggered and the image is saved.

2. Record Screenshot by wiping with the edge of the hand over the screen

You must activate in the settings of your Samsung Galaxy Note Edge this option first. Navigate therefore from the home screen to:

Apps --> Settings --> Motions and gestures -> Palm swipe to capture

Activate the option by switching the controller top right to "on". Now you can take a screenshots by wiping the edge of the hand over the entire display.

3. Use the S-Pen to record screenshots on the Samsung Galaxy Note Edge

Take the S Pen and hold it close to the screen, so that the pointer is displayed. Press the S Pen button once to display the Air Command Menu. Select the button "Write Screen" from the menu to take screenshots on your Samsung Galaxy Note Edge.

The screenshot will be saved regardless of the recording method in the gallery under the folder "screenshots".

You have now learned three different methods to take a screenshot on the Samsung Galaxy Note Edge. Most of the time the key combination will be the  convenient method to quickly take a screenshot. What do you like best?

More Articles ...

  1. Samsung Galaxy Note 4 looses net signal - Tip
  2. WhatsApp Deactivate read receipt - Solved
  3. Download WhatsApp without read receipts
  4. Reset the Samsung Galaxy S4 to factory settings
  5. Samsung Galaxy S5 Disable automatic spaces at Keypad
  6. Enable GPS tag for pictures on the Samsung Galaxy S4 - Solution
  7. Samsung Galaxy S4 How to enable kids mode
  8. Samsung Galaxy S4 Disable Automatic app updates - Solution
  9. Samsung Galaxy Note 4 Deactivate Roaming - Solved
  10. Android - How to detect roaming? Solution!
Page 296 of 317
  • Start
  • Prev
  • 291
  • 292
  • 293
  • 294
  • 295
  • 296
  • 297
  • 298
  • 299
  • 300
  • Next
  • End


  1. You are here:  
  2. Home

Imprint

Privacy Policy

Privacy and Terms of Google

Sitemap