Solvemix

Suche Spickipedia

  • Home
  • Android Smartphones
  • iOS Smartphones
  • Blackberry Smartphones

Samsung Galaxy Note 9 Is rSAP possible? Solved

Details
Manuel
Android Smartphones
Year 2019

For many users, the following technical feature is important when purchasing: rSAP. This is the so-called "Remote Sim Access Profile".

A car with an integrated telephone module, for example, can access this profile. Then only the Sim card of the smartphone is used, but reception etc. is provided by the car phone.

The advantage of rSAP is that you have better reception in a vehicle, as the antenna is usually mounted on the outside of the car. Does the Samsung Galaxy Note 9 support rSAP?

Since the Samsung Galaxy Note 9 is a dual SIM smartphone, rSAP is unfortunately not supported.

If you can't do without this feature, the Samsung Galaxy Note 9 won't be shortlisted.

Samsung Galaxy S8 Change storage location for screenshots

Details
Manuel
Android Smartphones
Year 2019

Screenshots are often created by smartphone users with the Samsung Galaxy S8. Such a screenshot is then automatically saved by the Android operating system in a "Screenshots" folder on the internal memory of the device.

This of course "garbage" the internal memory of the S8 over time and therefore you might want to change the storage location for newly created screenshots to the external MicroSD memory card.

Or you just want to change the location for screenshots. Unfortunately this is not possible with Android in the standard function.

For this reason we have written a step-by-step guide for you, how you can still save screenshots automatically in another location, such as the MicroSD. This works as follows:

Changing the location or directory for screenshots - Instructions

Samsung Galaxy S8

You need the following app from the Google Play Store: Auto Transfer Lite

If you have downloaded the app, proceed as follows:

Step 1. Start the app "Auto Transfer Lite"

Step 2. Select the plus symbol in the upper right corner to create a new "Auto Transfer" process

Step 3. Specify a name for the process e.g. "Screenshot Transfer"

Step 4. Touch "Source Folder" and select the screenshot folder of the Samsung Galaxy S8 from the list:

  • Internal Memory/DCIM/Screenshots Important!

Tap on the three dot symbol in the upper right corner and select "Show internal memory"!

Step 5: In "Target Folder", select the folder where the screenshots will be saved in the future.

For example a folder on the MicroSD memory card.

Step 6: Switches the "Scan Media file after moved" slider to "active"

Step 7: Tap on the floppy disk icon at the end to save and activate the auto transfer process

Every time you take a screenshot, it is automatically transferred to the new screenshot folder.

With this little workaround you have successfully changed the location for screenshots on the Samsung Galaxy S8.

Samsung Galaxy Note 9 Disable automatic space - Keyboard

Details
Manuel
Android Smartphones
Year 2019

If you write text on your Samsung Galaxy Note 9, the default Samsung keyboard will usually be used. This keyboard may now have the option to automatically set a space after a word.

The function for this is "Automatic Spaces".

The following instructions will explain step by step how to deactivate these on the Samsung Galaxy Note 9:

1.  Open the settings of Android

2. Scroll down to Language and Input and navigate from there as follows:

  • Screen Keyboard --> Samsung Keyboard --> Intelligent Typing

3. In this submenu you can now select "Automatic Spaces" and then deactivate the option on the Samsung Galaxy Note 9.

4. To do this, simply move the slider from "On" to "Off".

You have now deactivated the automatic space character on the Samsung Galaxy Note 9, which is automatically inserted by the keyboard after a word.

Samsung Galaxy Note 9 Remove words from dictionary - Tip

Details
Manuel
Android Smartphones
Year 2019

When writing text in emails, WhatsApp or SMS apps, usually the Samsung keyboard is used. This keyboard has a built-in dictionary that suggests words, but also learns new words from your vocabulary.

However, you may have misspelled a word, but the dictionary may have remembered it and suggested it to you every time.

Of course this is annoying and that's why you certainly want to delete such a mislearned word from the dictionary.

This works and we'll explain to you in detail how it works here:

1. Open an app on the Samsung Galaxy Note 9 that displays the keyboard. For example the SMS App or WhatsApp.

2. Now type in the first letters of the word you want to delete from the dictionary.

3. This will now be displayed in the preview bar above the keyboard. Press the entry for approx. 2 seconds and the following info box will appear: "Remove” - The following word will be removed from the dictionary".

You now know how to remove a wrongly learned word from the dictionary of Note 9.

Windows 10 Disable automatic spelling - Tutorial

Details
Manuel
Android Smartphones
Year 2019

The Windows 10 operating system has an integrated spell checker, also known as auto correction. This can automatically correct misspelled words in the search, data fields etc.

A comparison with the Windows language database is used. The auto correction of the spelling is not always efficient and therefore we have summarized here for you a manual, how you can deactivate this under Windows 10.

Deactivate autocorrection - Windows 10

Windows 10

1. Touch the Windows symbol on the keyboard and then select the gearwheel symbol to open the settings of Windows 10.

2.  From here it goes on to "Devices" and "Input"

3. In the section "Spelling" the following options have to be deactivated with the sliders:

  • Correct spelling mistakes
  • Automatically Highlight spelling mistakes

Then words are no longer automatically corrected by Windows 10.

Samsung Galaxy Note 9 Activate or deactivate automatic cloud backup

Details
Manuel
Android Smartphones
Year 2019

If you own a Samsung smartphone like the Samsung Galaxy Note 9, you will automatically receive a free cloud memory with 15 GB volume.

If you want to create a backup of your Samsung Galaxy Note 9 with data like pictures, messages, settings etc., you have to activate the Automatic Cloud Backup.

How this works is described step by step in this tutorial:

1. Open the Android settings on the Samsung Galaxy Note 9.

2. Go to "Cloud and accounts".

3. Navigate to "Samsung Cloud" and you will see an option with "Security settings".

4. Here you can enable or disable the automatic backup via the Samsung Cloud The automatic synchronization of your Samsung Galaxy Note 9 data with the Samsung Cloud is now active.

If you want to back up your data immediately, you can do this as follows: Tap on the symbol with the three dots in the upper right corner of the same menu and select "Synchronize now" from the pop-up menu.

Your data will then be saved.

P-ATA Port in Computer - Meaning? Solved

Details
Manuel
Android Smartphones
Year 2019

If you find a PATA port, also called P ATA or P-ATA, in your computer, you might ask yourself what this port is needed for or whether it is still up to date.

PATA stands for "Parallel Advanced Technology Attachment" and refers to an interface on the computer via which a hard disk can be connected.

This interface or connection is integrated directly on the computer's motherboard, but can also be retrofitted with a PCI plug-in card.

This interface offers a software protocol for data transfer between hard disks, CD and DVD drives and the PC. The PATA interface is now hardly considered by the manufacturers.

For this reason one can acquire also only small hard disk sizes up to approx. 2 TB for this connection.

You now know what PATA stands for and what background this connection to your PC has.

Huawei P20 Pro battery runs low very fast - solved!

Details
Manuel
Android Smartphones
Year 2019

The Huawei P20 Pro has a very large and powerful battery with 4,000 mAh installed, which usually lasts at average use for about 2 days until it needs to be recharged.

If you notice that the battery in your Huawei P20 Pro runs out very quickly, this is usually due to a software error in Android, or a newly installed app that is responsible for consumption.

In most cases, however, the following small workaround helps to reduce the rapid battery consumption.

This is: Wipe Cache Partition.

This is how the Wipe Cache Partition is executed on the Huawei P20 Pro
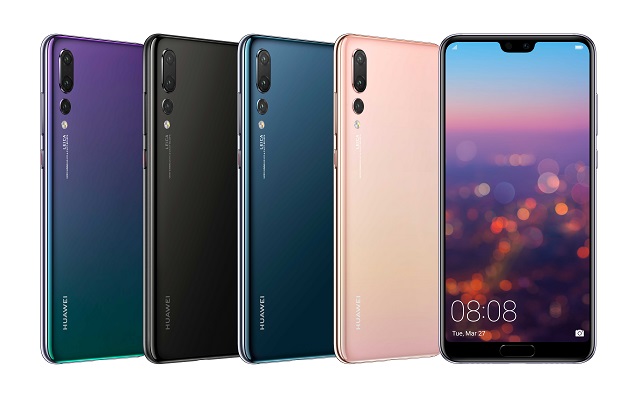
Huawei P20 Pro

1. First switch off the Huawei P20 Pro completely

2. Now switch on the Huawei P20 Pro again and keep the following key combination pressed at the same time: Power Button Volume Loud Button

3. Keep the buttons pressed until the Huawei logo disappears from the display and the screen is black.

4. You can now release the buttons. This will now display the boot menu after a moment.

5. Mark the entry "Wipe Cache Partition" with the volume keys of the Huawei P20 Pro.

Important! Please do not accidentally click on "Wipe Cache Factory Reset" <-- This will delete all data from the internal memory.

The Wipe Cache partition will not delete any private data from you. If you have marked the correct entry, confirm this by pressing the Power key.

The process is now performed on your P20 Pro, which usually only takes 1-2 seconds.

Then the boot menu appears again. Now select "Reboot system now" and confirm this by pressing the Power key. Then the battery of the Huawei P20 Pro should last as long as usual. With this workaround you have deleted old system files that are no longer needed, but slow down Android and consume battery power.

If this didn't help, please see the settings below:

Battery --> Battery usage --> Tap the i symbol to see which apps require the most battery power.

Then uninstall the app in question. In most cases the Wipe Cache Partition helps to reduce battery consumption.

Windows 10 do I have the 64 bit or the 32 bit version installed? Solved!

Details
Manuel
Android Smartphones
Year 2019

In Windows 10 there are two different bit variants: 64 bit or 32 bit. The differences are drastic, because with a Windows 10 with 32 Bit the RAM is limited to 4 GB RAM memory.

The 64 bit variant allows much higher RAM sizes. Perhaps you are now wondering which Windows you currently have installed.

Here we show you how you can find out this quickly and easily for your PC:

Windows 10

1. Touch the Windows icon on the keyboard and then select the gear icon to open the settings of Windows 10.

2. Now select the entry "System" and in the next window the entry "Info"

3. In the section "Device Specifications" the variant of Windows is now displayed under System Type.

This is possible:

  • Windows 10 32 Bit
  • Windows 10 64 Bit

You now know how to recognize under Windows 10 whether you have installed the 32 Bit or the 64 Bit variant.

Kawasaki H2R top speed? Acceleration 0-100 km/h? Solved!

Details
Manuel
Android Smartphones
Year 2019

The Kawasaki H2R is one of the fastest motorcycles you can buy today.

This is made possible by a lightweight construction combined with a powerful engine with compressor and balanced aerodynamics.

But how fast can the Kawasaki H2R really drive?

How fast are the acceleration values? Here we have summarized for you various driving data that the bike can perform.

Kawasaki H2R top speed: 400 km/h

Kawasaki H2R Acceleration:

0 - 100 km/h: approx. 3.1 seconds

0 - 200 km/h: approx. 6.5 seconds

0 - 300 km/h: approx. 13.4 seconds

The Kawasaki H2R is probably one of the fastest motorcycles currently available.

More Articles ...

  1. Samsung Galaxy S9 Sidelight Enable and Set Up
  2. Samsung Galaxy S8 Disable Maximum Volume Pop-Up Warning - Tip
  3. Samsung Galaxy S9 Do not show maximum volume warning any more - Solved
  4. OnePlus 6 Activate Camera Beauty Mode - Tip
  5. Honor 10 Change font size - Instructions
  6. One Plus 6 Camera Deactivate “Save GPS position”
  7. Samsung Galaxy S9 Enable Call Waiting - Solved
  8. Windows Photo App File system error 2147219196 - Pictures do not open
  9. Samsung Galaxy Note 9 screen is black - operation not possible
  10. Samsung Galaxy S9 screen remains black - Instructions
Page 55 of 317
  • Start
  • Prev
  • 50
  • 51
  • 52
  • 53
  • 54
  • 55
  • 56
  • 57
  • 58
  • 59
  • Next
  • End


  1. You are here:  
  2. Home

Imprint

Privacy Policy

Privacy and Terms of Google

Sitemap