Solvemix

Suche Spickipedia

  • Home
  • Android Smartphones
  • iOS Smartphones
  • Blackberry Smartphones

Huawei P20 Pro Add and Remove Widget - Homescreen

Details
Manuel
Android Smartphones
Year 2018

Using a widget on the Huawei P20 Pro you can easily display information and special functions from an app directly on the homescreen.

But of course you first have to place such a widget on the Home screen.

How this works in detail on the new Huawei P20 Pro is explained step by step in the following instructions. In addition, we also want to explain how to remove such a widget if it is no longer needed.

Add widget - Homescreen Huawei P20 Pro
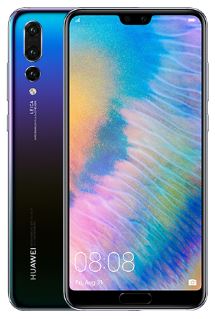
Huawei P20 Pro

1. Press with your finger long on a free area of the homescreen - It will now shrink and show a small menu at the bottom of the screen.

2. Select the "Widgets" button in the menu to display a list of all available widgets on the Huawei P20 Pro.

3. Search the list, which is sorted alphabetically, for the widget you want to place. Take a weather widget as a test.

4. Press and hold the widget with your finger until it lifts off and can be placed on the home screen.

5. Release the widget when it is in the correct position.

You have now successfully added a widget to the homescreen of your Huawei P20 Pro. Follow this procedure for each additional widget you want to place on the Home screen.

Remove Widget - Homescreen Huawei P20 Pro

To delete a widget again, press and hold the widget until a Remove icon appears at the top of the screen.

Drag the widget onto the icon to remove it. You now know how to add or remove a widget to the Home screen on the Android Smartphone Huawei P20 Pro.

Honor 10 Change layout of the navigation bar - Solved

Details
Manuel
Android Smartphones
Year 2018

Honor 10 has a navigation bar in which various buttons are arranged, such as the Home button, the Back button or the Task Manager button.

The symbols are arranged ex works in a certain layout, which may not appeal to you as you are used to a different layout.

No problem, because fortunately you can adjust the layout. In this article we would like to describe in more detail how this works:

1. To change the configuration of the navigation bar layout, first open the settings of your Honor 10

2. Now navigate further to: "System" and then to "System Navigation"

3. Now select the button "Virtual Navigation Bar" and then touch "Settings"

4. You can now select the desired combination of navigation keys from various combinations

Then the navigation bar at the bottom of your Honor 10 display will be adjusted accordingly.

Samsung Galaxy S9 Change color of status bar possible? Solved!

Details
Manuel
Android Smartphones
Year 2018

If you have selected a background image on your Samsung Galaxy S9, white in the upper area is very bright, then you may no longer be able to see the icons in the status bar correctly.

Because these are white or bright. And bright symbols on a bright background are not optimal.

Now you will ask yourself:

Is it possible to change the color of the status bar or the symbols on the Samsung Galaxy S9 in the settings?

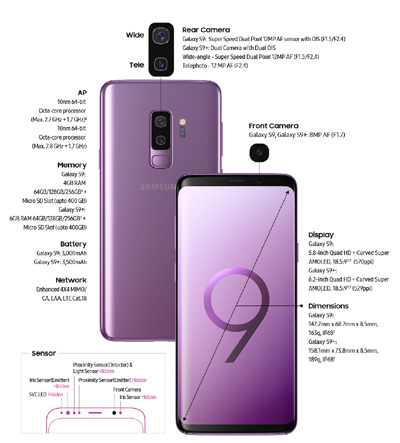
Samsung Galaxy S9 Hardware

You can find the answer here: Unfortunately it is not possible with the current Android firmware or the Samsung Experience Launcher to adjust the color of the status bar or the symbols.

Such an option is not integrated. However, you can use the following two tricks:

Edit background image

Edit the light background image so that a dark area is at the top instead of a light one.

Use other launcher - Nova Launcher

Use another launcher where you can adjust the color of the status bar. One such launcher is the Nova Launcher, which can be downloaded from the Google Play Store to the Samsung Galaxy S9.

  • Download Nova Launcher

Now you know that with the standard software of the Samsung Galaxy S9 it is not possible to adjust the color of the status bar or the symbols in it.

Honor 10 Completely deactivate mailbox - Resolved

Details
Manuel
Android Smartphones
Year 2018

In most cases, the mailbox is automatically activated on a new smartphone such as Honor 10 with a new SIM card and accordingly accepts all calls that do not come through to you.

If you want the mailbox to stop doing this and deactivate it accordingly, you can easily deactivate it with the Honor 10 as follows.

To do this, use the following GSM code on the Honor 10:

1. From the start screen, open the telephone app that you are actually using to make calls.

2. In the app, you must now switch to the number field and then enter the following GSM network code:

  • ##002#

3. Confirm the network code by pressing the call key (green handset).

Your Honor 10 now sends this network code to your mobile network operator, which means that all call diversions, including diversion to the mailbox, are deactivated.

If you now receive a call, it is no longer automatically forwarded to the mailbox after a certain period of time.

Samsung Galaxy S9 Remove Account - Solved

Details
Manuel
Android Smartphones
Year 2018

On the Samsung Galaxy S9 various accounts can be added by the user and of course removed again. Such an account can be for example:

Google account, Samsung account, WhatsApp account and many more.

If you now want to remove an existing account from the settings, then you must now proceed on the Samsung Galaxy S9 as follows in the Android settings:

Delete an existing Google, Samsung, Facebook, etc. account

Samsung Galaxy S9 Hardware

1. Open the settings

2. Navigate to "Accounts"

3. Select the Samsung account

4. In the next Android submenu tap the "More" button or the icon with the three dots in the upper right corner.

5. In the pop-up menu that now opens, you will find the "Remove account" button - select this and you have now successfully removed the account you selected.

You now know the procedure to remove an existing or already added account under Android.

Samsung Galaxy S8 charger gets extremely hot - solution

Details
Manuel
Android Smartphones
Year 2018

When charging the Samsung Galaxy S8, it can happen that the power supply, which is plugged into the socket, gets very hot very quickly.

If you want to prevent this, please check the following parameters or the following prerequisites.

It is possible that power supplies from other manufacturers are incompatible and do not deliver the required performance.

This will cause the power supply to get hot.

Only use original Samsung charger cable

Samsung Galaxy S8

It is also possible that a charger cable is used, which is intended for lower currents and therefore should not be used for fast charging with the Samsung Galaxy S8.

Again, it is best to use the original charging cable.

Deactivating quick charging

Quick charging causes a larger amount of power to flow through the AC adapter and charging cable to your Samsung Galaxy S8 battery. Try deactivating the quick charge feature and then check that it doesn't cause the AC adapter to get hot.

Open the menu from the start screen and then the following submenu:

  • Settings --> Device maintenance --> Battery

In this submenu you must now tap on the symbol with the three dots at the top right and then select "Advanced settings".

In the section "Recharge" you will now find the desired option. Deactivate now: Quick charging via cable.

Samsung Galaxy S9 charger power supply unit gets very hot - Solved

Details
Manuel
Android Smartphones
Year 2018

If you charge your Samsung Galaxy S9 via the charging cable, then you may notice that the power supply unit of the charger gets very hot.

Here we want to give you some tips to avoid the power supply getting hot:

Only use original power supply

Samsung Galaxy S9 Hardware

It is possible that power supplies from other manufacturers are incompatible and do not deliver the required performance. This will cause the power supply to become hot.

Only use original Samsung charging cables.

It is also possible that a charging cable is used, which is intended for lower currents and should therefore not be used for quick charging. Again, it is best to use the original charging cable.

Deactivating Quick Charging

Quick charging causes a larger amount of current to flow through the power supply and charging cable. For testing purposes, deactivate quick charging and then check that it does not cause the AC adapter to become so hot.

To do this, open the menu from the start screen and then the following submenu:

  • Settings --> Device maintenance --> Battery.

In this submenu you must now tap on the symbol with the three dots in the upper right corner and then select "Advanced settings".

In the section "Recharge" you will now find the desired option. Deactivate now:

  • Quick charging via cable

Huawei P20 Pro Google Maps Arrow indicates wrong direction - Solved

Details
Manuel
Android Smartphones
Year 2018

In Google Maps, an arrow at your position will show you in which direction you are looking. This is very useful, especially if you're a pedestrian navigating.

Unfortunately, this arrow in Google Maps may point in a completely wrong direction. The reason for this is usually that the magnetic compass of the Huawei P20 Pro is not correctly calibrated.

Because the arrow in Google Maps uses the compass when you are standing. In order to calibrate the compass or the magnetic sensor, the following instructions must be followed on the Huawei P20 Pro:

Huawei P20 Pro

1. Opens the previously installed compass app on the smartphone. This can be found in the folder "Tools"

2. Swing the Huawei P20 Pro in front of you in the form of a horizontal "8"

3. Then turn the Huawei P20 Pro around each of its three axes once completely.

Now the magnetic sensor should work properly again, which you can check immediately in the opened compass app.

So the arrow on the Huawei P20 Pro within Google Maps should point around your position in the right direction.

Garmin Fitness Smartwatch Extreme battery consumption after firmware update

Details
Manuel
Android Smartphones
Year 2018

If you have a Garmin Fitness Clock, such as the Garmin Forerunner or Fenix series, you will receive firmware updates from time to time, which are installed via the Garmin Connect App on your clock.

If a new update has now been installed, this may cause problems, such as increased battery consumption.

If you notice that your Garmin Fitness watch has a significantly higher battery consumption than it did before the update, please proceed as follows:

Attention! All saved data and settings will be deleted! Reset Garmin Forerunner Series to factory settings:

In our manual we will show you:

How to reset all data on the Garmin Forerunner 235 to default settings:

1. Open the menu on the Garmin Forerunner 235 and then the settings.

2. Navigate here to "System" and continue to "Restore factory settings".

3. Confirm the prompt with "Yes".

How to Reset Garmin Fenix Series to factory settings

For the Garmin Fenix 3, the clock can be reset to factory settings as follows:

1. Press and hold the "Up" key or the "Menu" key.

2. Then select "System" and continue to navigate here. Then select Settings --> System.

3. Open "Factory settings" and confirm the reset with "Yes".

This should resolve the problem with a rapidly depleting battery on your Garmin Fitness watch.

The factory reset deletes old system files that are still in the cache of the watch. These old files often cause problems with the newer Android firmware.

We hope that the battery of your Garmin watch will last longer and that you will continue to enjoy it.

Huawei P20 Pro Camera Optimal setting for photos

Details
Manuel
Android Smartphones
Year 2018

With the 40 megapixel camera of the Huawei P20 Pro you can take great photos. Already the preset options that are found in the camera app produce good results.

But if you want to get even more out of the Huawei P20 Pro camera, we recommend the following optimal settings in combination with the automatic mode:

Disable Master AI 

Huawei P20 Pro

The AI program selects automatically the best setting for the object or landscape you are aiming for. Unfortunately, this artificial intelligence does not always match the correct setting, so we recommend that you deactivate it here:

First open the camera app and then the settings there and then deactivate the slider at "Master AI"

Deactivate HDR

The HDR function at the Huawei P20 Pro unfortunately brings mostly very supersaturated results, which is why we also recommend you to deactivate this option in the camera settings.

Photos can also be edited afterwards using the image editing program of the gallery and the colors can be enhanced.

To deactivate HDR open the camera app. In the live screen you can now see various icons at the top. Tap the second icon from the right here. Set the setting to "Standard".

Set the resolution to 40 megapixels

We recommend that you use the maximum resolution of the Huawei P20 Pro when taking photos. Therefore, set the resolution to 40 MP in the Camera App under Settings.

Install current firmware

The camera of the Huawei P20 Pro is improved from time to time by new firmware updates. If the camera of the Huawei P20 Pro still had some weaknesses at the start of sales, these are now almost eliminated.

Nevertheless, new functions will be implemented or the compression optimized

Pro camera mode and RAW will be activated - Get the most out

The tips mentioned so far refer to the automatic mode of the Huawei P20 Pro. But you can also activate the "Pro Mode", where you can get even more out of your settings.

Definitely one should select the smallest possible value at "ISO" in good lighting conditions. This way you can take very fine pictures and get the maximum image quality.

If you then activate the raw mode, which can only be activated in Pro Camera mode, then there are even more options available in the post-processing.

Thus, the saturation of the photos can be changed relatively lossless etc.

We hope that you will be able to take great photos with your Huawei P20 Pro using the above settings. Have fun taking pictures.

More Articles ...

  1. Samsung Galaxy S9 Video Quality Poor - Possible Reason
  2. Android GPS shows wrong position - No GPS fix
  3. Samsung Galaxy S8 Prevent from activating the display when charging - Solved
  4. Samsung Galaxy S9 Prevent turning on the screen while charging - Solved
  5. Honor 10 How to activate W-Lan calls - Wi-Fi calling
  6. Samsung Galaxy S8 How to remove account in the settings - instructions
  7. Huawei Mate 10 Pro Add and delete widgets
  8. Instagram How to disable and enable autoplay of videos? Solved!
  9. Samsung Galaxy S9 GPS problems and GPS fix inaccurate - Solved
  10. Samsung Galaxy S10 release probably again in February 2019
Page 67 of 317
  • Start
  • Prev
  • 62
  • 63
  • 64
  • 65
  • 66
  • 67
  • 68
  • 69
  • 70
  • 71
  • Next
  • End


  1. You are here:  
  2. Home

Imprint

Privacy Policy

Privacy and Terms of Google

Sitemap