Solvemix

Suche Spickipedia

  • Home
  • Android Smartphones
  • iOS Smartphones
  • Blackberry Smartphones

Huawei Mate 20 Pro Update Software manually - Solved

Details
Manuel
Android Smartphones
Year 2019

New firmware updates for the Huawei Mate 20 Pro are released from time to time, usually at least once a month, to increase the current security patch level of Android.

However, the update is not always displayed immediately, even if the "Automatic update" is switched on.

For this reason, it makes sense to manually search for a new firmware update yourself. This way you get the update faster to your Huawei Mate 20 Pro.

How to manually search for and install a new firmware on the Huawei Mate 20 Pro is explained below:

Updating Software - Manual Procedure
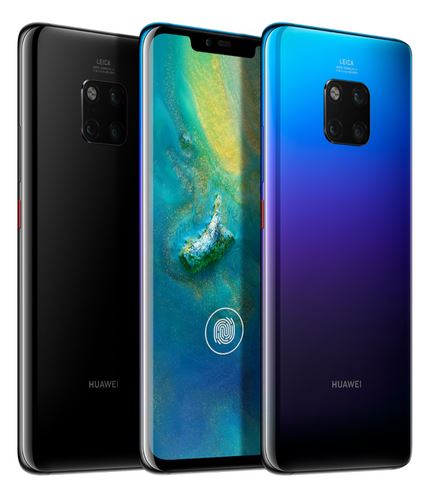
Huawei Mate 20 pro

1. To do this, start from the Huawei Mate 20 Pro's home screen and open Android's System Preferences.

2. It then goes to "Systems" and then to "System Update".

3. Your smartphone will now automatically check for new firmware updates via a W-Lan or mobile data connection.

4. If a newer version than currently installed is available, it will be offered for download.

When the download on the Huawei Mate 20 Pro is complete, please touch the "Update" button.

Now install the new firmware on the Huawei Mate 20 Pro and restart the unit. You have just performed a manual update of the firmware.

Samsung Account Session Expired - Solved

Details
Manuel
Android Smartphones
Year 2019

It can happen that on a Samsung Galaxy smartphone like the S9, S8, S7, S6, S5 etc. a message is displayed in the status bar with "Samsung account session expired".

This error message usually comes suddenly and is associated with the fact that the smartphone can no longer be synchronized with the Samsung account.

But what can be done to make the error message disappear? We would like to tell you this in the following.

Fix Samsung account session expired error

To fix the problem, all you need to do is log into your Samsung account using a web browser. (Best via a PC)

Open the official support page of Samsung and register there as follows:

  • Support Samsung

Tap "Login" in the upper right corner and then follow the login wizard.

Once you have logged in using your Internet browser, your Samsung smartphone or tablet will also sync your Samsung account properly.

The "Samsung Account Session Expired" message will no longer appear in the status bar of your Samsung smartphone or tablet.

We hope that this tip will work for you as well and fix this annoying bug.

Xiaomi Black Shark How to Take Screenshot - Tip

Details
Manuel
Android Smartphones
Year 2019

The Xiaomi Black Shark is not only ideal for playing games, but also as a daily smartphone in everyday life. So, of course, all functions that a smartphone has to offer are included, such as the screenshot.

If you don't know how to create a screenshot on the Xiaomi Black Shark quickly and easily yet, we will now explain this step by step.

Take a screenshot with the Xiaomi Black Shark

1. The display of the smartphone should show what should be saved later in the screenshot

2. Press and hold the following buttons simultaneously for at least 2 seconds:

  • Power button
  • Volume-Silent Button

3. The screenshot is now triggered, which can then be edited or shared directly.

Of course you can also find the screenshot within the gallery app of the Xiaomi Black Shark.

Now you know how to quickly and easily take a screenshot with the Xiaomi Black Shark.

Huawei P20 Pro camera app slow and picture stops

Details
Manuel
Android Smartphones
Year 2019

When you shoot photos and videos with the Huawei P20 Pro camera app, the app may suddenly be very slow, the image may stop, and delays of several seconds may occur.

This is especially annoying if you want to take photos or videos with the Huawei P20 Pro in quick succession.

But what can you do in such a situation if the camera is slow and reacts badly? In the following we have summarized a few tips for you, which can solve the problem.

Troubleshoot problems with the camera app of the Huawei P20 Pro - Tips

HUawei P20 Pro

Tip 1: Perform a restart

Very often it helps to restart the Huawei P20 Pro. This restarts processes and services that may have previously caused the camera app to malfunction.

Tip 2: Lots of photos and videos in the camera folder

If there are a lot of photos and videos inside the camera folder, the camera app may need a few seconds or more to store new photos and videos.

Mostly the problems start with about 3000 photos. The more images there are in the camera folder, the more problems you have with the camera app.

Tip 3: Reset Camera App

Reset the camera app to eliminate errors. The app data and the cache are deleted, which often results in the camera app running better afterwards.

Please keep in mind that settings such as IOS settings in Pro mode will be lost. The camera app can be reset as follows:

From the Home screen, open Settings, then navigate to Apps & Notifications. From here it goes on:

  • apps

Scroll through the list of apps until "Camera" is displayed. Select the entry. Now tap on "Save" and then select the following buttons one after the other:

  • Delete data
  • Clear Cache

Then restart the phone.

Tip 4: Install the latest firmware

It is important that the current firmware is installed on the Huawei P20 Pro. Check this by manually searching for a new firmware.

Open to it:

  • Settings --> System --> System update

Tip 5: Wipe Cache Partition

One option to consider last is the Wipe Cache partition on the Huawei P20 Pro. This can be used as follows:

We hope that one of these tips has helped you repair the slow-reacting camera app of the Huawei P20 Pro so that photos can be taken quickly again.

Huawei P20 Pro USB Data Transfer Aborts with Large Data Volumes - Tips

Details
Manuel
Android Smartphones
Year 2019

The Huawei P20 Pro has a 128GB internal memory, which gets fuller with time. Usually you have stored several thousand pictures and videos on the internal memory, which you have taken with the integrated main camera.

If the time has come for you to back up the data to your computer or to swap it out, the USB cable is usually used, so you connect the Huawei P20 Pro to your PC via USB cable and start transferring the photos and videos.

Here it becomes then usually already immediately problematic.

1. The image folder can usually no longer be opened with large amounts of data in "DCIM - Under Windows, "No feedback" appears.

2. If images can be copied, an error message "Unknown error" may appear.

So what can you do if you have to transfer large amounts of data from the Huawei P20 Pro like photos and videos to a computer via USB? The following instructions will help you:

Tips if the DCIM folder cannot be opened via USB on the Huawei P20 pro

Huawei Mate 20 pro

Use USB 3.0 port

If available, it is important that a USB 3.0 port is used on the PC. You can find out whether you have such a connection here:

  • Do I have a USB 3.0 port?

Original USB cable

Use the original USB cable included with your P20 Pro. A test with another cable has led to the problems described above.

Enable USB debugging

The USB debugging helps to optimize the transfer in any case. How to enable USB debugging is explained in this article:

  • Use USB Debugging Use USB Debugging

Transfer method "transfer photos"

After you have connected the Huawei P20 Pro via USB cable, pull down the status bar and select "Settings - Load via USB". Then a window opens where further options can be defined. Here's how it looks:

USB Settings - Huawei P20 pro

  • Transfer photos
  • Transfer files
  • Load only
  • reverse charging
  • Enter MIDI

Please select "Transfer photos" here.

We hope that one of the four tips has helped you to transfer the large amount of pictures and videos from your Huawei P20 Pro via USB cable to your computer and save them there.

GMail Add external email address - Tip

Details
Manuel
Android Smartphones
Year 2019

Anyone who has become fond of the GMail app on their smartphone for synchronizing their e-mails may also want to retrieve other e-mail addresses outside the GMail address in it.

For this reason, we want to explain to you here today how to use the GMail App to access external e-mail addresses such as Freenet, GMX, Web.de, AOL, etc.

Synchronization of other mail addresses with GMail App

First open Gmail on your smartphone.

In the overview, tap the symbol with the three bars in the upper left corner or wipe your finger from the left edge of the display to the middle.

In the side menu scrolls down to the bottom and selects "Settings".

Here you can add a new e-mail account to GMail by clicking the button "Add account".

After you have typed the entry, you can choose between "Google Account" or:

GMail App - Create new email account

  • Outlook, Hotmail and Live
  • yahoo
  • GMX
  • T-Online
  • web.de
  • Exchange and Office 365
  • Other

Selects “Other”if you want to add an account for Freenet.

You can now set up your email address and Gmail will automatically retrieve the correct access settings.

Only your password for the e-mail account is still needed. Then tap Next and the new email account will be added within the Gmail app and can be used afterwards.

Now you know how to easily synchronize and organize another external e-mail account within the GMail App.

Samsung Galaxy S9 Status LED does not flash - Solutions

Details
Manuel
Android Smartphones
Year 2019

The status LED of the Samsung Galaxy S9, which is integrated next to the camera, displays various statuses and notifications to the user. For example, the LED constantly lights red when charging or flashes green, blue or white when new food such as WhatsApp or e-mail arrives.

But what if the LED stops flashing overnight?

The possible causes for this are rarely a defect in the hardware, but mostly have to do with the software of the smartphone.

In the following we want to show which options and settings you should check on the Samsung Galaxy S9 in Android when the notification LED no longer flashes on new unread notifications.

1st System Restart of the Samsung Galaxy S9

Samsung Galaxy S9

The LED that is no longer flashing may partly be caused by the fact that the mobile phone has not been restarted for a longer period of time.

To avoid this case with your Samsung Galaxy S9, you should now restart the Samsung Galaxy S9 once.

2. Is the LED display activated in the Android settings?

Next, you should of course check whether the notification LED is activated in the system settings. This function may have been inadvertently or automatically deactivated after a firmware update.

To do this, navigate from the smartphone's home screen to the App menu and then to Settings.

Continue to "Display". Scroll down until you see "LED Display". Activates the controller here to activate the LED display if it is deactivated.

3. Disable energy saving modes

If the Samsung Galaxy S9's Power Saving Mode or Ultra Power Saving Mode is active, the Notification LED is automatically deactivated.

For this reason, you must now switch off the power-saving mode on the Samsung Galaxy S9 in order to make the notification LED flash again. Drag the notification bar with two fingers from above into the display and then deactivate the corresponding toggles.

4. Wipe cache partition - remove old temporary system files

A wipe cache partition removes old temporary system files that may cause the status LED to fail.

But the Wipe Cache partition is not so easy to do and therefore we have written a separate manual for you here:

  • Wipe Cache Partition - Samsung Galaxy S9

We hope that you could solve the problem with the no longer flashing status LED on the Samsung Galaxy S9 with one of the mentioned solutions.

Samsung Galaxy S8 Notification LED no longer flashes - Tips

Details
Manuel
Android Smartphones
Year 2019

The notification LED of the Samsung Galaxy S8 displays various statuses and notifications to the user. The LED flashes when new food such as WhatsApp or e-mail arrives.

But what if the LED stops flashing overnight?

The cause for this is rarely a defect in the hardware, but usually a matter of settings in Android or factors related to the system.

In the following we want to show which options and settings you should check on the Samsung Galaxy S8 when the notification LED no longer flashes on new unread notifications.

System Restart of the Samsung Galaxy S8

Samsung Galaxy S8

The status LEDs that are no longer flashing are often due to the fact that the phone has not been restarted for a longer period of time. To avoid this case with your Samsung Galaxy S8, you should now restart the Samsung Galaxy S8 once.

Is the notification light activated in the settings?

Next, you should of course check whether the notification LED is activated in the system settings. This function may have been inadvertently or automatically deactivated after a firmware update.

To do this, navigate from the smartphone's home screen to the App menu and then to Settings.

Continue to "Display". Scroll down there until you can see "LED Display" Activate the slider to activate the LED display if it is deactivated.

Disable energy saving modes

Unfortunately, if the Samsung Galaxy S8's power saving mode or ultra-power saving mode is active, the notification LED is automatically deactivated.

For this reason, you must now deactivate the power-saving mode on the Samsung Galaxy S8 to make the notification LED light up again.

Drag the status bar with two fingers from above into the display and then deactivate the corresponding toggles.

Wipe cache partition - remove old temporary system files

A wipe cache partition removes old temporary system files that may cause the status LED to fail.

But the Wipe Cache partition is not so easy to do and therefore we have written a separate manual for you here:

  • Wipe Cache Partition - Optimize Samsung Galaxy S8

We hope that you could solve the problem with the no longer flashing status LED on the Samsung Galaxy S8 with one of the mentioned solutions.

Huawei P20 Pro Add reminder or appointment to Google Calendar

Details
Manuel
Android Smartphones
Year 2019

The Huawei P20 Pro already has a calendar on board, but maybe you'd rather use the Google Calendar to have easy and uncomplicated cross-system access to it.

Because that works better with the Google calendar than with Huawei's own solution.

If you would like to enter an appointment or a reminder, please proceed as follows within the Google calendar:

Add reminder or appointment - Google Calendar

Calendar function

1. Open on the Huawei P20 Pro the Google Calendar App

2. Select a date on which the appointment or reminder is to be entered

3. Tap on the plus symbol - now choose between:

  • target
  • memento
  • appointment

4. Once you have made a selection, you can now set the title, date, time and other reminder options.

5. Select "Save" - the appointment will now be entered in the Google calendar.

You now know how to add a new appointment or reminder to your Google Calendar with the Huawei P20 Pro.

Huawei Mate 20 Pro Notification LED does not flash - Solution

Details
Manuel
Android Smartphones
Year 2019

The Huawei Mate 20 Pro has a status LED as hardware installed, which shows you by flashing light in different colors that a new unread notification has arrived.

However, it may happen that the notification LED of your Huawei Mate 20 Pro stops flashing overnight and no longer displays any messages.

This can now have different causes and therefore we want to support you with this contribution to solve the problem.

Because usually the LED is not defective, but the cause lies in a setting in Android:

Huawei Mate 20 pro

Restart the Huawei Mate 20 Pro

Many problems, including the LED that no longer blinks, are due to the fact that the phone has not been restarted for an extended period of time.

To rule out this case, you should now restart the Huawei Mate 20 Pro once.

Is the notification light activated in the settings?

Furthermore you should of course check if the notification LED is activated in the Android settings. This may have been inadvertently deactivated.

To check, please open:

  • Settings --> Apps & Notifications --> Notification & Status bar

Here the controller must be activated for "Notification light".

Disable energy saving modes

Unfortunately, when the Huawei Mate 20 Pro's power saving mode is active, the status LED is automatically turned off.

Therefore, deactivate the power saving mode on the Huawei Mate 20 Pro to make the notification LED light up again.

Open the settings and select "Battery". Then deactivate the controller at "Power saving" and "Ultra Power Saving". Ready!

Perform Wipe Cache partition

A wipe cache partition removes old temporary system files that may cause the status LED to fail.

Since the Wipe Cache partition is not so easy to perform, we have written the corresponding instructions for you here:

  • Wipe Cache Partition - Optimize Huawei Mate 20 Pro

We hope that you were able to solve the problem with the no longer flashing status LED on the mate 20 Pro with one of the solutions mentioned above.

More Articles ...

  1. Huawei P20 Pro Notification LED no longer flashing - Solved
  2. Huawei P20 Pro Troubleshoot contact search problems - Solved
  3. Huawei P20 Pro Change Ringtone - Instructions
  4. Android 9.0 Pie GPS does not work or is inaccurate - Tip
  5. Samsung Galaxy S8 Clean charging socket - Instructions
  6. Samsung Galaxy S8 battery is no longer charging - Help
  7. Huawei P20 Pro Cleaning the charging socket - Instructions
  8. Huawei P20 Pro battery does not charge - tips and tricks
  9. Create and rename iPhone folders – How it works
  10. Huawei P20 Pro Delete Clipboard - Instructions
Page 13 of 317
  • Start
  • Prev
  • 8
  • 9
  • 10
  • 11
  • 12
  • 13
  • 14
  • 15
  • 16
  • 17
  • Next
  • End


  1. You are here:  
  2. Home

Imprint

Privacy Policy

Privacy and Terms of Google

Sitemap